本文共 1804 字,大约阅读时间需要 6 分钟。

1、现在适合转行吗?
市场整体供大于求,但中高级测试仍缺乏,对学历的要求也会越来越高,对学历真实性的验证也会越来越严。
现在还适合转行吗?具体根据你的年龄、学历、学习能力综合考虑。
并且:IT行业是没背景没学历的人逆袭的唯几途径。
以上两个观点,并不是矛盾。细细理解。
2、需要什么技能?
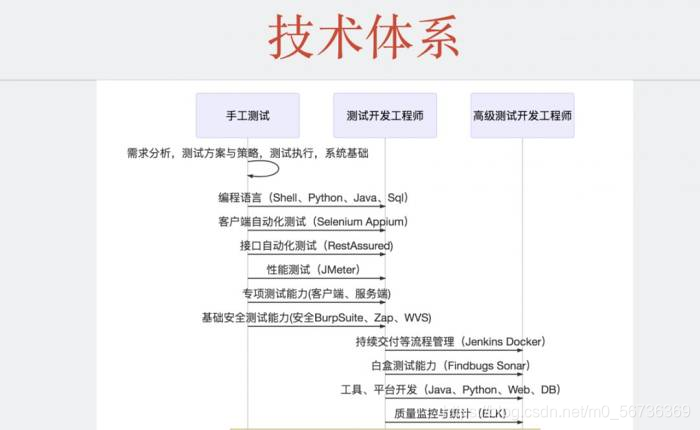
需要什么技能完全取决于你要到什么高度。
测试跟开发的很大一个不同就是,开发是技术的深度,测试是技术的广度。当然,深度也要有一点。
中高级测试技术体系:
3、怕培训班过不了试用期
生扛啊,担心归担心,还能因为这个不转行?
培训班出身的这个好说,一般稍微靠谱点的培训机构,都是会提供入职之后远程技术支持的,毕竟你是付费vip。
自学的小伙伴就多加几个测试群,提问的时候说清楚问题(提问也是个技术活),这个就靠天吃饭,如果有人愿意回答。
4、测试在工作中的地位
虽然现在都说什么测试的地位正在逐步提升,公司也越来越重视之类。这话说明什么,说明以前的测试地位是真的没有存在感。
在开发的印象中,测试就是只会点一下看个结果,结果不对就要去找他解决的麻烦货
我的亲身经历:
经历1
开发A提醒我:每次输入的数据要不一样的噢~
我说:我写了一个随机数的
开发A眼睛一亮,说:你还会写这个?
经历2
我问开发B:你这里的实现逻辑是什么?
开发B说:你有必要知道吗?你还要教我写还是怎样。
我说:现在就是吧啦吧啦……地方是错的。
开发B说:em…确实有问题…这个地方的逻辑是这样的吧啦吧啦……
上面两个事情可以说明,
第一,大多数开发还停留在N年以前的印象,觉得测试是什么都不懂的弱鸡。(刻板印象都会有,建立刻板印象很容易,粉碎刻板印象很难)
第二,你要懂开发,才能反制。不用说要多会写代码,但你要知道开发流程、写代码的逻辑、一些基本的语法。
这其实跟其他岗位一样,你说话有价值,自然得到尊重,有话语权。你说话没有价值,别人不会为你浪费时间。
5、测试加班吗?
马爸爸说,996是福报呢?
加班与否、忙不忙都是看公司、看项目的,不能一概而论。
软件开发的流程上来说,软件开发阶段,开发忙,测试不忙,开发完成后,测试忙,开发不忙。
但事实往往不如人意。当开发完A功能后,提交给测试;此时开发人员本可以休息,但由于迭代周期快,或者多项目并行,有可能开发人员需要继续开发B功能。同理,测试好不容易把A功能测试完了,B功能也该开发好了,继续测试走起。
所以,忙不忙,看公司是否处于高速发展、抢占市场、用户量级大等需要快准狠的阶段。这样的公司,一般等待开发、等待完善的需求、功能较多,老板也比较拼,老板也希望大家拼一拼。
忙不忙,看项目的用户是公司(toB)还是用户(toC)。一般业务toB的,用户量小,宽容度较高,迭代周期慢。这样的公司不加班或者少加班。业务toC,一般用户量较大,宽容度小,迭代周期快。
忙不忙,看项目的客户端。一般web端迭代慢。移动端迭代快。
本测试渣,待过几个不同风格的公司,可以供你参考。
1、平安旗下独角兽公司,业务toB
网页端,一个月三分之一加班2小时左右,发版当天看发版情况有可能到凌晨。
2、头条系,业务toC
移动端,每周一个版本迭代,每个版本天天发灰度,单双周,算996。干了2星期太猛烈了就撤退了。
3、创业型小公司,业务toB
网页端,创业公司初创阶段,用户不多,不加班。开发有时候会加班。
前段时间github出了一个项目,996.ICU, 即996进ICU病房的意思,维护了一些义务996的公司名单。
同时也衍生出了一些周边,如955.WBL,即work-life balance,维护了一些955的公司名单。大家入坑之前,不妨根据名单仔细斟酌一下。
其实文章还没写完,但是现在不结尾,今天就发不出去了。敬请期待后续~

这些资料,对于【软件测试】的朋友来说应该是最全面最完整的备战仓库,这个仓库也陪伴我走过了最艰难的路程,希望也能帮助到你
关注我的微信公众号【伤心的辣条】免费获取~
送上一句话:
世界的模样取决于你凝视它的目光,自己的价值取决于你的追求和心态,一切美好的愿望,不在等待中拥有,而是在奋斗中争取。
推荐好文:
原文不易呀,麻烦伸出发财小手点个赞,感谢您的支持,你的点赞是我持续更新的动力。
转载地址:http://zdzc.baihongyu.com/